Tuesday, October 14, 2008

Ink Refill Kit

How much money do you spend for ink refill of your personal printer? In my case, it is quite a lot because I use it for my daily work. My printer is Canon PIXMA iP1300. It has 2 catridges in it. One is black color catridge and the other is 3-color catridge. A new original one will cost me around Rp 180,000 for black and Rp 225,000 for color (around USD18 and USD 22.5). They will last for about 1 pack of 500-sheet of A4 papers for draft mode and usually less than 1 pack for standard mode. But you can refill the catridge at refill or recycle center for Rp 30,000 for the black and Rp 50,000 for the color (around USD3 and USD5). In addition to these, you will spend some more time to get the new catridge or find the refill center.

Pic_003

Recenly I decided to install an automatic and continuous ink refill kit on my little printer. I think the kits have been popular for quite sometime but I just decide to use it now :-) Actually there are 2 kits. One for the ink refill and the other is the ink disposal. As you maybe know that, each time the printer finish all the queued jobs, the catridge will go to home positon and dump quite a lot of ink through intenal tubing to its sponge pad at the base. I guess a lot of the ink go wasted with such a mechanism :-) You will hear a lot of noise when the printer goes to its home position and wastes its precious ink.

Pic_005

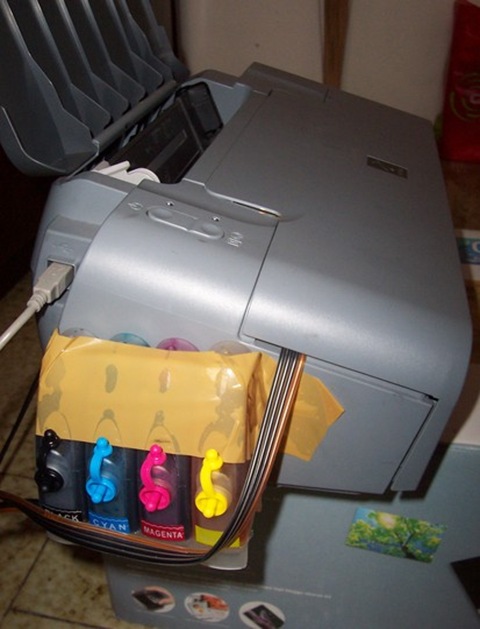
To install the refill system is a lot more easier than to install the disposal kit. You need good catridges both for black and color because the system relies on the small flexible tubing which acts as a capillary tube, I assume :-) You make a hole on top of black catridge and 3 holes for the color. Insert one end of the tubing into the catridge through the hole by using a kind of special connectors included in the kit. The other ends go to 4 containers of black, cyan, magenta and yellow ink. The containers are already filled in with ink. Paste the containers with double tapes at the left side of the printer.

Pic_006

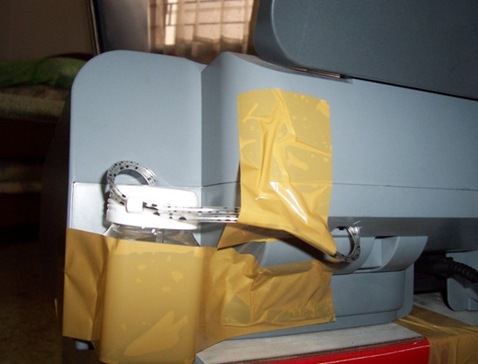
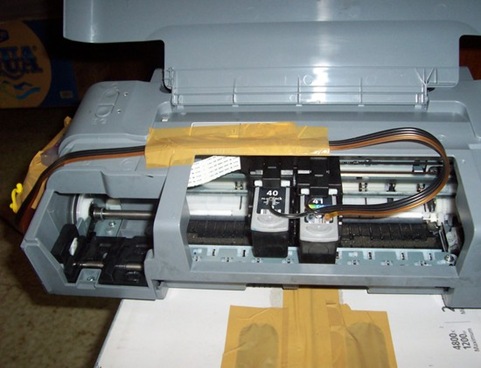
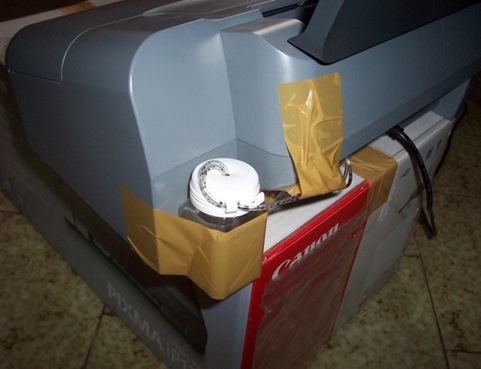
To install the disposal kit is quite hard. You have to open the upper cover of printer. There are quite many screws you have to dealt with. I will not cover how to do this in this post however :-) After opening the cover, you can reach the holders of the catridges from inside. There are 2 small tubings comes out of the holders each for black and color catridge. The ends of the tubings are left open and downward to the sponge pad which will adsorb the disposed ink everytime the printer does a home movement and cleaning task. Extend these 2 tubing with extra tubing comes with the kit. Join them so that the tubing run out of the printer. Put the other end of the additional tubing into a small transparent container which will accomodate the disposed ink. Paste the containing with double tape and extra tape at the back of the printer.

Pic_007

You must do several deep cleaning process and print trial until you can see that the ink can flow from the ink containers and out into the disposal container. It is enough if you can see that all part of the tubing is fully filled with ink. The appearance of the printer becomes quite ugly but anyway I just care for its performance and saving quite a lot of money. That's it folks.... You can see the pictures for clarity :-)

Tuesday, October 7, 2008

Automatic Switch Lamp Holder

Several weeks ago I installed 2 (two) automatic switch lamp holders for the two lamp fittings at the front of my house. They cost me around Rp 25,000 a piece and are made in china (again?). I cannot find the brand on its casing but I know it is quite a good product which I usually get from my local supplier.

Pic_003

Why did I install this kind of stuff? Well, first of all, I like to try new interesting product which may benefit you especially concerning energy saving or the kinds :-) Furthermore, this automatic switch will switch on your bulb automatically if there is no sufficient ambient light, ie: at dusk or night, and it will swicth off your bulb automatically if there is enough ambient light, ie: at dawn or daylight. The photosensor is an LDR (Light Dependent Resistor) or photoresistor with a kind of lense in front of it. The resistance value of LDR decreases with increasing incident light intensity.

Pic_005

Here is an excerpt from Wikipedia about LDR made from cadmium sulfide cells:

"Cadmium sulfide (CdS) cells rely on the material's ability to vary its resistance according to the amount of light striking the cell. The more light that strikes the cell, the lower the resistance. Although not accurate, even a simple CdS cell can have a wide range of resistance from less than 100 Ω in bright light to in excess of 10 MΩ in darkness. Many commercially available CdS cells have a peak sensitivity in the region of 500nm - 600nm (green light). The cells are also capable of reacting to a broad range of frequencies, including infrared (IR), visible light, and ultraviolet (UV). They are often found on street lights as automatic on/off switches. They were once even used in heat-seeking missiles to sense for targets. Standard cadmium based LDRs have a frequency response that varies according to light level, but typical fall times range from 15ms to 25ms and typical rise times range from 50ms to 70ms, so they may be unsuitable for data links and picture scanning. Silicon based photodiodes and phototransistors are orders of magnitude faster. Probably the best known LDR is the ORP12. Smaller cheaper devices are more popular today."

Pic_006

You can leave your house whole day and night, and the automatic switch will take care of your home lightings, when to turn it on or off. The installation is very very simple. It is put between normal lamp fitting and the bulb. For detail, please see the pictures. Screw in the automatic switch on to the fitting till it is fixed. Then screw in the bulb on to the automatic switch lamp fitting. You may change the positon of the clip-on photosensor in order to adjust its sensitivity. In my case, I adjust the photosensor lense to face straight to the front of the house in order to get the exposed dayight from the sun. It can accept power till 60W as stated in the casing but I suggest half of the power rating will be much safer (due to made in china?),  ie: 30W. Anyway, any energy saving lamps I use are less than 25W so that it is no problem at all.

Pic_009

So far, it seems the automatic switch works well. And furthermore, it just costs me around USD2.5 for a wonderful switch. I hope it will stand quite a long time before the sensitivity becomes worse. Let's see...

Sign up for PayPal and start accepting credit card payments instantly.