Saturday, November 24, 2012

How to Turn Off Windows Defender in Windows 7

There are 2 good articles from internet ( link 1 and link 2) about  turning off Windows Defender in Windows 7. I posted here as a good reference for who needs to know to turn off Windows Defender before installing other full complete anti-virus programs such as Windows Security Essentials.

Windows Defender isn't in Control Panel's list of uninstallers. Microsoft started bundling Windows Defender with Vista, and continues to do so with Windows 7. It's a real-time antivirus program, running in the background at all times and checking for malware as you download and open files. A quick note on definitions: Some people will argue that Windows Defender is an anti-spyware program, not an antivirus one. That once meant something, but not anymore. Today, any such program that doesn't look for all known types of malware is useless. Unfortunately, Windows Defender is completely built into Windows, and you’re not going to actually uninstall it. What we can do, however, is disable it. To do so, click Start, type defender, and click Windows Defender.

Open up Windows Defender, go to Tools on the top menu, and then click on Options.


Now click on Administrator on the left-hand pane, uncheck the box for “Use this program”, and click the Save button.


You will then be told that the program is turned off. Awesome!


If you really, really want to make sure that it never comes back, you can also open up the Services panel through Control Panel, or by typing services.msc into the Start Menu search or run boxes. Find Windows Defender in the list and double-click on it…


And then you can change Startup type to Disabled.


Now again, we’re not necessarily advocating that you get rid of Windows Defender. Make sure you keep yourself protected from malware!

Thursday, November 8, 2012

Create or Delete A Service in Windows XP

Services in Windows XP are programs that run in the background and perform certain functions relative to the operating system or a program running on the operating system. If you are a fan of tweaking your system and disabling services, you might find that over time your Windows Services list becomes huge and unwieldy with a large number of services in the list that will never be enabled.

Instead of just disabling a service, you can alternatively completely delete the service. This technique can be especially helpful if you’ve installed some piece of software that doesn’t uninstall correctly, and leaves an item in the service list.
Important Note: Once you delete a service, it’s gone, and it’s going to be a pain to add it back. Use with caution.

Here is a good article from "The Elder Geek" about it. This is the link

Services are added from the Command Prompt. You need to know the actual service name as opposed to what Microsoft calls the Display Name. For example, if you wanted to create or delete the Help and Support service, the name used at the Command Prompt would be "helpsvc" rather than the Display Name of "Help and Support". The actual service name can be obtained by typing "services.msc" in Run on the Start Menu and then double clicking the Display Name of the service. Once you know the name;
To Create A Service
  • Start | Run and type cmd in the Open: line. Click OK.
  • Type: sc create "service name"
  • Reboot the system

Fig. 01
To Delete A Service
  • Start | Run and type cmd in the Open: line. Click OK.
  • Type: sc delete "service name"
  • Reboot the system

Fig. 02

If you prefer to work in the registry rather than through the command prompt to delete services;
  • Click Start | Run and type regedit in the Open: line. Click OK.
  • Navigate to HKEY_LOCAL_MACHINE\SYSTEM\CurrentControlSet\Services
  • Scroll down the left pane, locate the service name, right click it and select Delete.
  • Reboot the system.


Sunday, October 21, 2012

How To Uninstall Firefox Add-ons With No Remove Option

This article is a copy from Martin Brinkmann is a journalist from Germany who founded Ghacks Technology News Back in 2005. He is passionate about all things tech and knows the Internet and computers like the back of his hand. You can follow Martin on Facebook or Twitter. The original page can be accessed here.
I considered that the article is quite important for the one who needs to solve his problem with troubled plugins in Firefox so that I copied and shared here again as one of my favorite tools to solve my problem too. Enjoy..


You can uninstall most Firefox add-ons from the addons manager page in the web browser. All you need to do is type in about:addons in the address bar and tap on the enter key to open the page. A click on remove next to an add-on uninstalls it from the browser. You may need to restart the browser to complete the process. The add-on afterwards has been removed completely.
Some add-ons on the other hand do not show a remove option at all in the addons manager. Most of the add-ons that you cannot uninstall from within the browser are called global extensions. They are installed from third party sources, for instance when you install or update security software or another application on your system. The Babylon Toolbar is an example extension as it is often attached to software installations.
The majority of extensions are installed in the extensions directory of the Firefox profile folder. I’d suggest you start there to see if the extension that you want to remove from Firefox is listed there.
firefox extensions
You may run into two issues here. First that extensions sometimes install with cryptic names so that it may be difficulty to identify them, and second that you may not find the extension that you want to uninstall listed here.
The easiest way to identify add-ons here is to load them into archiving software like 7-zip. Double-click on the install.rdf afterwards and look for name there.
unknown firefox addon
extension name
Some extensions are already unpacked in a folder. Just open the folder of the extension in that case and double-click on the install.rdf file in there to identify its name.
It is however likely that you do not see the extension in the directory.
Global extensions
Global extensions can be installed into any directory. The most likely folder is the extensions folder in the Firefox installation folder. This is usually C:\Program Files (x86)\Mozilla Firefox\extensions for 64-bit Windows operating systems, and C:\Program Files\Mozilla Firefox\extensions for 32-bit systems. Keep in mind though that you can install Firefox into any directory. Portable Firefox users need to open the extensions folder under the portable path.
Repeat the steps outlined above to identify all extensions listed here.
The third and final option is the Windows Registry. You may find extension information under the following two Registry keys:

  • HKEY_CURRENT_USER\Software\Mozilla\Firefox\Extensions\
  • HKEY_LOCAL_MACHINE\Software\Mozilla\Firefox\Extensions\
Use the shortcut Windows-r to bring up the run box. Enter regedit in there and hit enter. Navigate to the keys in the Windows Registry and check if extensions are listed there.
registry extensions
Information that you will find there includes the extension path.
extension path
Backup the Registry key first by selecting File > Export. Open Windows Explorer and navigate to the directory of the extension. Backup that directory as well, before you delete both the directory and the Registry key that links to it. Repeat the step for all extensions that you want to delete.
Please note that you need to close Firefox before you start deleting extensions on the system this way.
If you follow the method, you should be able to delete any extension that you cannot uninstall from within the browser interface.

How To Remove Plugins From Firefox

This article is a copy from Martin Brinkmann is a journalist from Germany who founded Ghacks Technology News Back in 2005. He is passionate about all things tech and knows the Internet and computers like the back of his hand. You can follow Martin on Facebook or Twitter. The original page can be accessed here.
I considered that the article is quite important for the one who needs to solve his problem with troubled plugins in Firefox so that I copied and shared here again as one of my favorite tools to solve my problem too. Enjoy..

One of the most annoying things in Firefox is that third party software can install add-ons and plugins without the user’s consent. That’s a big no-no from a security standpoint obviously, and it remains a mystery why the developers have never bothered to fix that flaw by adding a confirmation dialog whenever a new plugin or add-on tries to install itself automatically.
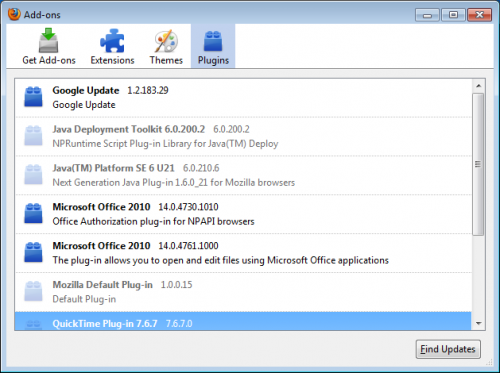
We leave it at that for the moment. Now, Firefox users end up with plugins installed that they have not added to the browser. On our test system those were for instance: (name, description)

  • Google Update: Google Update
  • Microsoft Office 2010: Office Authorization plug-in for NPAPI browsers
  • Microsoft Office 2010: The plug-in allows you to open and edit files using Microsoft Office applications
  • Quicktime Plug-In: The Quicktime Plugin allows you to view a wide variety of multimedia content in Web pages. For more information, visit the QuickTime Web site.
  • Silverlight Plug-In
  • Windows Live Photo Gallery: NPWLPG
Other Firefox users will probably find other plugins there that have been installed automatically.
firefox plug-ins
Plugins can be disabled in the Plugins manager, but not uninstalled or removed completely from the web browser. Entering about:plugins in the Firefox address bar will display additional information about each installed plugin. Users who visit the screen for the first time may want to type in about:config first, to change the preference plugin.expose_full_path to true. This displays the path to the plugin in the about:plugins dialog.
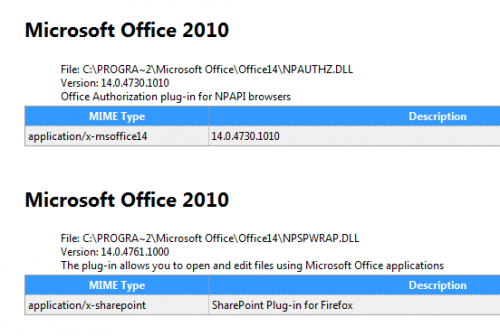
Displaying the path to the plugin does one thing: It enables the user to locate the plugin source on the hard drive. Just open the folder on the hard drive afterwards, backup the plugin file and delete it afterwards to remove it completely from Firefox. Here is how it is done for the two Microsoft Office 2010 plugins.
microsoft office plugins
Locate the plugin paths in about:plugins and open the folders on the hard drive. In the case of Microsoft Office 2010, both plugins are located in the C:\Program Files (x86)\Microsoft Office\Office14\ folder on the hard drive (Please note, that the location on 32-bit systems is C:\Program Files\Microsoft Office\Office14\ instead).
The name of the first plugin is NPAUTHZ.DLL, the one of the second NPSPWRAP.DLL. We highly suggest to backup plugins before deleting them from the system, just in case they need to be restored at a later time. Plugins can be deleted while the browser is running, and doing so will immediately remove most of them from the about:plugins information window and the plugins manager in Tools > Add-ons. Some plugins may require a browser restart before they are completely removed from the browser.
To remove all plugins that are not used or needed simply go through the listing of plugins in about:plugins, locate the paths of those plugins on the hard drive, and backup and delete the plugin files.
There is also the possibility that some plugins have added themselves in the Windows Registry, Google Update comes to mind for instance. You can take a look at this guide How To Stop Automatic Plugin Installations In Firefox for an in depth walkthrough, or locate HKLM\Software\MozillaPlugins or HKLU\Software\MozillaPlugins in the Windows Registry to see if plugins have been added there as well. Again, export the Registry key first before deleting it, for the ability to restore the setting at a later time.


Friday, September 21, 2012

Uncompress Old Files after Windows XP Disk Cleanup

After using Windows XP Disk Cleanup, you may find that some files in your drive have been compressed by that action. In the previous article, it is shown how to disable this act of compression during Windows XP Disk Cleanup. However, if you have been using this utility without disabling the compression, many of your files end up being compressed which can take more time to open or access them.

Below you will find a simple procedure how to uncompress ALL the old files after using Windows XP Disk Cleanup:

  1. Goto Start
  2. Goto Run and type cmd to open a command prompt
  3.  Type cd \ at the prompt to goto the root directory
  4.  Type compact /u /s /a /q /i *.* to uncompress all files in all directories
That's all folks!

Saturday, March 17, 2012

Disable "Compress Old Files" during Windows XP Disk Cleanup

When you select the Disk Cleanup function in the Windows Disk Properties dialog box, you might need to wait longer then you want. Cleaning up your system is normally something you do when you notice your computer is getting slow, so waiting for a cleanup operation is not desired.

The main reason the disk cleanup function in Windows XP takes time is because of the Compress old files function. One of the cleanup options involves a file compression possibility, where Windows checks for the amount of space that can be saved by compressing old files.

If you do not want to wait, or simply never use the compress old files option, you can disable it and speed up the disk cleanup check. Follow the steps below to change the Windows configuration to disable the compress old files function.

The steps below involve changing the Windows registry. Make sure you create a backup of the registry before you make these changes, so you can revert back in case of problems.

  1. From the Start menu, select Run.
  2. In the Run dialog box, type regedit and press Enter.
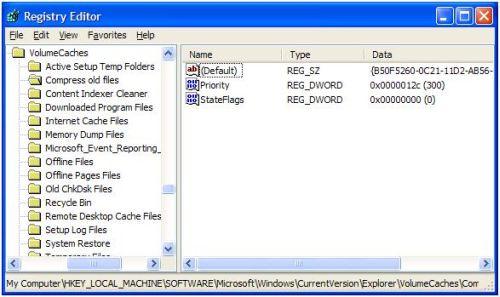
  3. In the Registry Editor, locate and open the following registry key:
    HKEY_LOCAL_MACHINE\SOFTWARE\Microsoft\Windows\
    CurrentVersion\Explorer\VolumeCaches
  4. In the expanded registry key, select the sub-key called Compress old files.
  5. Disable Compress old files in disk cleanup
  6. In the Edit menu, select Delete. Click Yes to confirm the delete operation.
  7. Next, close the Registry Editor and restart Windows.
After this the disk cleanup will no longer check for the extra space gained by compressing old files. If you want to enable the function again, simply restore your registry backup, which will bring back the deleted registry key.

Sign up for PayPal and start accepting credit card payments instantly.